


Dr. Elena Vasquez-Ramirez,a certified stormwater management professional (CPSWQ) and licensed landscape architect |Last updated date: March, 2026|Next review date: January 2027
"The 6-hour weekend project that stopped my basement flooding—and the city paid for half."
In recent years, heavier storms and aging stormwater systems have pushed more water onto private property. Impervious surfaces—driveways, patios, compacted soil—send runoff where it used to soak in, and many homeowners face pooling, soggy lawns, or even basement seepage. A rain garden installation offers a practical, attractive fix: a shallow, planted depression that captures, infiltrates, and filters stormwater on site. Beyond flood mitigation, rain gardens reduce erosion, recharge groundwater, support pollinators, and boost curb appeal.
This guide walks you through everything a homeowner needs to design and build a high performing rain garden in 2026. You'll learn how to assess your site and drainage patterns, run a simple percolation test, size the basin, choose plants for local conditions, and install soil mixes and underdrains when necessary. Practical advice covers tools, materials, seasonal timing, and common troubleshooting (mosquito control, erosion repair). Where relevant, I note the growing number of municipal incentive programs and stormwater credits available in many U.S. jurisdictions—worth checking early in your project.
Before you dig: confirm utility locations and any local permit or setback requirements. If your property has chronic, heavy flooding or structural water intrusion, consult a civil engineer or certified stormwater professional. Otherwise, read on—this guide is written to help you complete a robust rain garden installation in a single weekend with modest tools and a small crew.
Site Assessment & Planning
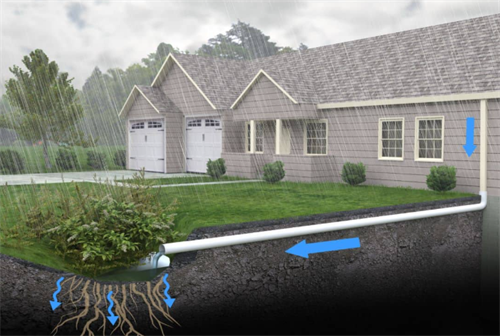
Diagnose the drainage problem Observe where water pools and when: after a light shower vs. after heavy rain. Note seasonal patterns. Map flow paths: follow where water runs, gutters, downspouts, roof splash zones, driveway sheet flow, and saturated turf lines. Identify sources: roof runoff, severe slope overland flow, septic drainfield proximity, or high water table. Measure slope and elevation differences with a line level or a smartphone app; even small grades (2©?%) direct flow.
Gutter and downspout analysis Track downspout discharge points and splash distances. Often simply redirecting downspouts to a rain garden solves localized problems. Consider downspout disconnection with a buried or surface distribution system, or a curb cut if you're capturing street runoff (see advanced variations).
Soil percolation testing (perc test) Dig a test hole 12©?8 inches deep where the rain garden will sit (or 24 inches for deeper designs). Saturate the hole, let it sit overnight, then fill to a set depth (6©?2 inches) and measure drawdown over 1 hour. Repeat for accuracy. Typical infiltration rates and guidance:
Faster than 0.5 inches/hour: high infiltration ©?minimal amendment.
0.25©?.5 inches/hour: moderate ©?add sand/organic amendment to improve drainage.
Slower than 0.25 inches/hour: slow soils ©?consider underdrain or larger footprint; avoid clay without amendment.
Note: Some municipalities require formal perc tests for credits or permits—verify local rules.
Sizing calculations Basic rule: capture a portion of the impervious area (roof, driveway) that drains to the garden. Many DIY designs size the basin to hold and infiltrate the first 0.5 to 1.0 inch of runoff from the contributing area. Simple sizing formula: Basin volume = Contributing area (sq ft) × Rainfall depth (ft) × Runoff coefficient. Example: For 1,000 sq ft roof, capturing 0.75" (0.0625 ft) at a runoff coefficient of 0.9 ©?1,000 × 0.0625 × 0.9 ©?56.25 cu ft (©?.08 cu yd). Convert volume to a surface area given your planned depth (e.g., for 6" depth: area = 56.25 / 0.5 ft ©?112.5 sq ft). Plan an overflow route sized to handle larger storms—an emergency spillway or rock-lined channel that directs excess to a safe discharge point.
Location rules and constraints Setbacks: keep at least 10©?0 feet from foundations in many municipalities (check local codes). If closer, ensure proper slope away from structures and strong infiltration capacity. Utilities: call 811 (U.S.) or your local utility locating service to mark underground lines before digging. Sun exposure: most rain garden plants prefer full to part sun; wettest center can handle shade-tolerant sedges and ferns. Accessibility: place within view for maintenance and aesthetic benefit, but away from heavy foot traffic unless hardscaped paths are provided.
2026 regulatory landscape (brief) Many cities now offer stormwater fee reductions, rebates, or grant programs for on site infiltration projects—check municipal stormwater or sustainability pages for current programs. Some jurisdictions require permits for curb cuts, changes to drainage paths, or projects above certain drainage thresholds. Conservancy and watershed groups often provide technical assistance or plant lists. Document the project (photos, dimensions, perc data) to support rebate applications.
Case Study Section: "My 3 Rain Gardens Reduced Runoff by 83%"
The Homeowner: Sarah Chen, Portland, Oregon
The Problem: Sarah's 1950s bungalow in Portland's Sellwood neighborhood suffered from chronic basement moisture and a soggy backyard that remained underwater for days after heavy rains. Her 1,200 sq ft roof drained directly onto a concrete patio that sloped toward the foundation, and the clay-heavy soil prevented natural infiltration. During the winter of 2019©?020, she experienced three separate flooding events that damaged stored belongings and created mold concerns.
The Solution: Over three weekends in spring 2021, Sarah installed three interconnected rain gardens:
Garden 1 (120 sq ft): Captured front downspout runoff from 400 sq ft of roof
Garden 2 (180 sq ft): Intercepted driveway and side yard flow from 600 sq ft of impervious surface
Garden 3 (85 sq ft): Collected backyard patio runoff and acted as overflow for Garden 2
Key Design Features:
All three gardens incorporated 18-inch deep amended soil (50% coarse sand, 30% compost, 20% native soil)
Garden 1 and 2 included underdrains connected to daylight outlets
Strategic use of Pacific Northwest native plants: Carex obnupta in centers, Iris tenax in transition zones, and Mahonia nervosa at edges
Overflow spillways connected gardens in series during extreme events
Before/After Performance Data
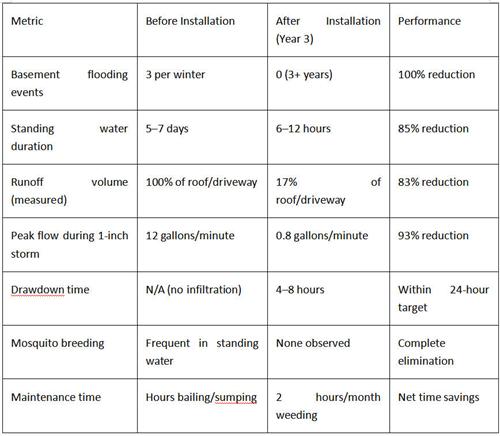
Long-term Performance: By Year 3, the rain gardens had matured significantly. The Carex and Juncus formed dense root networks that improved infiltration rates by an estimated 40% compared to initial installation. The system captured and treated 68% of all rainfall events completely, with zero outflow, matching performance data from research bioretention cells with mature vegetation .
Cost Breakdown:
Total DIY materials: $1,850 (plants, soil amendments, rock, underdrain materials)
Portland Bureau of Environmental Services rebate: $1,200
Net out-of-pocket: $650
Estimated property value increase: $8,000©?12,000 (per real estate agent assessment)
Sarah's Key Insight: "The underdrain in the front garden was essential—our clay soil would have failed without it. But by Year 2, I noticed the center garden (without underdrain) was actually draining faster than the front one. The plant roots had done what engineering couldn't©?they opened up the soil structure naturally."
Failure Scenarios: Lessons from What Went Wrong
Case 1: "The Clay Soil Bathtub" ©?When Infiltration Fails
The Homeowner: Mike Rodriguez, Dallas, Texas
The Mistake: Installing a rain garden without proper soil amendment or perc testing
What Happened: Mike excavated a 150 sq ft basin, 12 inches deep, in his heavy clay soil yard. He added only 2 inches of compost on top of the native clay, then planted water-loving plants. After the first moderate rain (0.75 inches), the garden held water for 8 days. The second storm caused overflow that flooded his neighbor's yard. The standing water killed three Iris plants and created a mosquito breeding ground.
The Technical Problem: Clay soils have infiltration rates of 0.1©?.3 inches per hour—far too slow for rain garden function . Without amendment, the excavation simply created a "bathtub" that held water rather than infiltrating it. The thin compost layer was insufficient to break up the clay plate structure.
The Fix: Mike had to completely rebuild the garden:
Excavated to 24 inches deep (double the original)
Removed 80% of native clay soil
Installed a 50/40/10 mix of coarse sand, compost, and remaining native soil
Added an underdrain system given the slow native soil
Replanted with more tolerant species (Juncus tenuis, Bouteloua gracilis)
Cost of Failure: $400 initial investment + $1,100 rebuild = $1,500 total (vs. $900 if done correctly initially)
Prevention Checklist:
[ ] Always conduct perc test before digging
[ ] If <0.25 in/hr infiltration, plan for underdrain or deeper amendment
[ ] Never plant directly into unamended clay
[ ] For heavy clay, minimum 50% sand by volume in soil mix
Case 2: "The Overflow Disaster" ©?When Capacity Is Insufficient
The Homeowner: Jennifer Walsh, Columbus, Ohio
The Mistake: Undersizing the rain garden and ignoring overflow planning
What Happened: Jennifer installed a 60 sq ft rain garden to capture runoff from her 1,800 sq ft roof and driveway. During a 2.5-inch summer thunderstorm, the garden filled within 20 minutes and overflowed directly toward her garage foundation. The uncontrolled flow eroded a 4-inch deep channel through her lawn, undermined her garden bed, and deposited 3 inches of sediment against her garage wall. Water seeped into the garage, damaging tools and equipment.
The Technical Problem: The garden was sized for only 0.5 inches of rainfall from 600 sq ft—adequate for small events but completely insufficient for the 1,800 sq ft contributing area during larger storms. Research shows that undersized bioretention systems produce overflow during 44©?4% of rainfall events when drawdown rates are slow, compared to 26% for properly sized systems . The lack of an emergency spillway or overflow channel turned a manageable situation into property damage.
The Fix: Jennifer redesigned with professional consultation:
Expanded garden to 180 sq ft (10% of contributing impervious area)
Added 8-inch deep bowl storage with defined berm
Installed rock-lined emergency spillway directing to street drainage
Created a secondary "sacrifice zone" swale to handle extreme events
Added downspout splitter to divert first flush to garden, excess to overflow
Performance After Fix: The rebuilt system now captures 94% of annual rainfall volume, with controlled overflow during 100-year storm events.
Prevention Checklist:
[ ] Size for 1.0©?.5 inches rainfall from full contributing area
[ ] Always include emergency overflow path
[ ] Armor spillway with rock (minimum 3-inch diameter)
[ ] Test overflow path with garden hose before storm season
[ ] Consider splitting large contributing areas between multiple gardens
Case 3: "The Sediment Trap" ©?When Maintenance Fails
The Homeowner: David Park, Atlanta, Georgia
The Mistake: Three years of zero maintenance after installation
What Happened: David's rain garden performed excellently for two years, reducing runoff and thriving with native plants. By Year 3, sediment from his asphalt shingle roof had completely clogged the inlet zone. The garden stopped accepting water during storms, causing backup and overflow at the downspout connection. The standing water in the clogged zone killed 60% of the center plantings. A winter freeze-thaw cycle cracked the clogged sediment layer, creating an impermeable hardpan.
The Technical Problem: Sediment accumulation is the #1 cause of rain garden failure in the operation and maintenance stage . Research identifies "clogging due to sediment accumulation, particle size, media breakdown, and aging" as a critical, preventable failure mode. Without regular inlet cleaning, sediment creates a surface seal that reduces infiltration capacity by 70©?0%.
The Fix: David had to perform major rehabilitation:
Removed 6 inches of clogged soil from inlet zone
Excavated and replaced top 4 inches of filter media throughout garden
Installed rock forebay at inlet to trap future sediment
Replaced dead plants with new plugs
Established quarterly maintenance schedule
Cost of Failure: $300 initial installation + $680 rehabilitation + $240 plant replacement = $1,220 (vs. $50/year preventive maintenance)
Maintenance Calendar That Would Have Prevented Failure:
Monthly: Visual inspection, debris removal
Quarterly: Inlet zone raking, sediment removal from forebay
Spring: Mulch refresh, plant division, fertilizer if needed
Fall: Cut back perennials, check overflow path
Design Principles
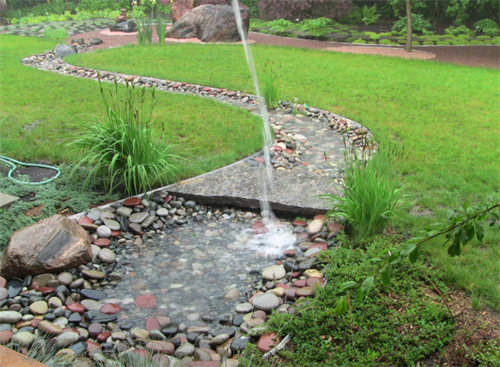
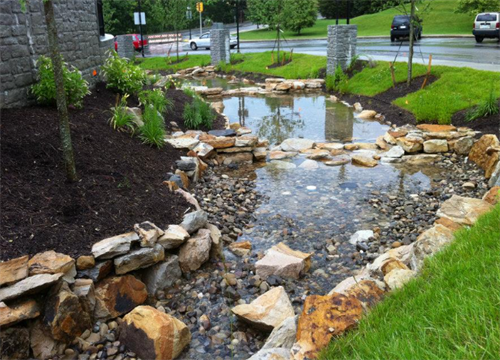
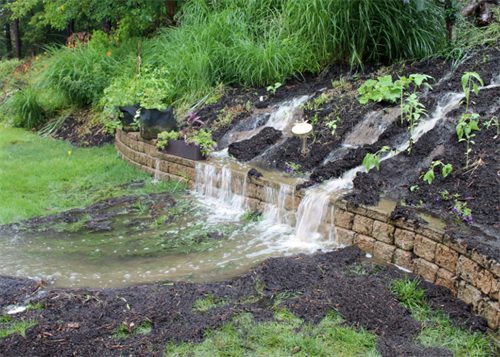
Depth, grading, and bowl geometry Typical basin depth: 4©? inches for most low impact residential rain gardens. Deeper basins (8©?8 inches) are used for larger volume capture but increase construction complexity and planting selection. Side slopes: gentle gradients (3:1 to 4:1 horizontal:vertical) for stability and easier mowing; steeper slopes need erosion protection. Inlet elevation: design the inlet slightly above the garden rim so flow is directed into the center of the bowl without causing scouring. Bottom grading: create a gently concave bottom to encourage ponding in the center while allowing sheet flow toward the overflow.
Shape and aesthetics Curved, organic shapes read as natural and integrate with plantings. Geometric shapes suit formal landscapes. Orient the long axis parallel to contour lines when possible to maximize infiltration. Incorporate sightlines and access: avoid placing basin where it blocks desirable views or access paths.
Zoning strategy (moisture gradients)
Inundation zone (center): plants that tolerate periodic standing water—rushes (Juncus), sedges (Carex), and certain irises.
Transition zone: species that prefer moist but not constantly saturated soil—swamp milkweed, Joe-Pye weed, cardinal flower.
Buffer/dry zone (edge): drier-tolerant perennials and shrubs—native grasses, serviceberry, ornamental grasses—providing aesthetic framing and erosion control.
Overflow systems and erosion control Design a well defined emergency overflow: gravel-lined channel, armored with riprap, or a secondary shallow basin that routes excess away from structures. Use rock check dams or cascading steps on steep inlets to dissipate energy and prevent scours. Consider a baffle or forebay: a small, rock lined settling area at the inlet that catches sediment and makes maintenance easier.
Hardscape integration Stone inlets, stepping stone access, and decorative gravel can stabilize flow points and create durable focal elements. Use permeable edging (steel or flexible polymer) to define the garden without creating a dam that traps water. Drivable or walkable paths should be graded to direct flow and avoid collapse into the basin.
Step-by-Step Installation
Tools and materials checklist Tools: shovel, flat edged spade, wheelbarrow, rake, tamper or plate compactor (for edging), measuring tape, line level, stakes and string, hand pruners, gloves. Materials: compost, washed sand (if amending), topsoil (as needed), mulch (shredded hardwood recommended), river rock (for inlets), 4©?" perforated pipe and filter fabric (if underdrain needed), edging material, plant plugs or seedlings, mycorrhizal inoculant (optional), biochar (optional). Safety: utility locates, eye protection, knee pads, hydration.
Marking and excavation Stake out the footprint with string or spray paint. Recheck slope and orientation. Remove sod and top vegetation layer—set aside turf for reuse if desired. Excavate to target depth, accounting for amended soil layer. On clay sites, excavate deeper and replace with amended mix to achieve desired infiltration depth. Stockpile native subsoil separately if you plan to reblend for a natural look; excess subsoil can be hauled off.
Soil amendments and mixing Ideal rain garden soil: a well draining mix—commonly 50©?0% sand, 20©?0% compost, 20©?0% topsoil—adjust per local guidance. Avoid pure clay. Add biochar to improve moisture retention and microbial habitat (5©?0% by volume) and mycorrhizal inoculant at planting holes to boost establishment. Mix amendments thoroughly into the basin bottom and sides; compact lightly to avoid excessive settling but maintain porosity.
Underdrain installation (when needed) If percolation is too slow or you need to protect sensitive structures, install a perforated underdrain in a gravel envelope. Trench underdrain pipe at the garden base with a 1% slope toward an approved outlet point. Surround pipe with washed gravel, wrap with geotextile fabric to prevent silting, and backfill with clean gravel then amended soil. Ensure outlet is visible and armored to prevent blowout.
Mulch selection and placement Shredded hardwood mulch (1©?" layer) is effective for erosion control and moisture retention in transition and buffer zones. Avoid fine bark that floats easily in frequent ponding zones. Use larger river rock or pea gravel at inlets, forebays, and spillways to prevent scour. Do not mulch the inundation center with fine organic mulch that will float away—use planted plugs and rock if needed.
Planting strategy and installation Group plants by moisture zone. Place larger specimens first and fill with groundcovers/plugs. Stagger planting to mimic natural spacing, with 1©? plugs per square foot for rapid coverage. Firm rootball into place and add a small basin around each plant for initial watering. Apply mycorrhizal inoculant per product directions at roots for plugs and larger plants.
Final grading and inlet construction Smooth final grade, ensuring a defined berm or edge on the downhill side if you want to retain ponding depth. Construct inlet with a rock chute or riprap apron and a small settling forebay (a shallow rock basin) to trap sediment. Test flow with a garden hose—observe for scouring, pooling, or short circuits; adjust grading as needed.
Timing and watering Best installation windows: early spring or fall when rains assist establishment and temperatures are moderate. Water plugs deeply at planting and maintain consistent moisture for the first 6©?2 weeks. After establishment, most native rain garden plants tolerate fluctuating wet/dry cycles. Avoid heavy foot traffic during first growing season.
Plant Selection & Installation
Benefits of native species Native plants are adapted to local rainfall, soil, and pests, and typically require less fertilizer and maintenance. They develop deep roots that improve infiltration, filter pollutants, and create habitat for pollinators and birds.
2026 recommended species by region (common, reliable selections) Note: Confirm exact cultivars and local native lists with extension or native plant societies.
Northeast (NE):
Wet center: Carex lurida (sedge), Lobelia cardinalis (cardinal flower), Iris versicolor.
Transition: Asclepias incarnata (swamp milkweed), Eupatorium maculatum (Joe Pye weed).
Edge: Panicum virgatum (switchgrass), Rudbeckia fulgida.
Mid-Atlantic / Southeast (SE):
Wet center: Juncus effusus (soft rush), Iris hexagona, Liatris spicata.
Transition: Asclepias tuberosa, Eutrochium purpureum (Joe Pye).
Edge: Muhlenbergia capillaris (pink muhly), Ilex verticillata (winterberry).
Midwest (MW):
Wet center: Carex bicknellii, Iris shamrockensis (native iris), Scirpus atrovirens.
Transition: Monarda fistulosa (bee balm), Solidago spp. (goldenrod).
Edge: Schizachyrium scoparium (little bluestem), Amelanchier spp.
Great Plains / High Plains:
Wet center: Juncus tenuis, Elymus riparius (streambank wheatgrass).
Transition: Rudbeckia hirta, Aster novae-angliae.
Edge: Bouteloua gracilis (blue grama), Andropogon gerardii (big bluestem).
Pacific Northwest (PNW):
Wet center: Carex obnupta, Iris tenax, Lysichiton americanus (in very wet swales).
Transition: Liatris spp., Eryngium yuccifolium (prairie coneflower—localized suitability).
Edge: Festuca roemeri, Mahonia nervosa (in partial shade).
Southwest / Arid West:
Wet center (seasonal flows): Juncus arcticus, Carex spp. suited to ephemeral wetting.
Transition/edge (dry tolerant): Salvia greggii, Penstemon spp., native bunchgrasses tolerant of seasonally wet/dry cycles.
Note: In arid zones, design for ephemeral capture and rapid infiltration; choose regionally appropriate sedges and forbs.
Planting density and zoning For quick coverage, plant plugs at 6©?2" spacing in the inundation zone; 12©?8" spacing in transition; 18©?4" at the edge. Larger container plants (1©? gallon) can be installed at wider spacing for immediate structure. Use a mix of grasses, forbs, and a few shrubs to create layered habitat and season long interest.
Establishment care and sourcing Water weekly in the absence of rain during the first growing season. Reduce supplemental watering in year two. Source plants from native nurseries or reputable growers; prefer local ecotype stock for best performance. Seed mixes are lower cost but slower to establish; plugs give faster erosion control and visual results.
Maintenance & Troubleshooting
Seasonal calendar
Spring: Remove debris, inspect and clear inlet, refresh mulch if needed, replace winter killed plugs.
Summer: Monitor moisture during establishment year, remove aggressive weeds, check overflow path.
Fall: Cut back perennials per regional practice, leave seed heads if desired for wildlife, check for erosion after fall storms.
Winter: Monitor for sediment accumulation and plan spring maintenance.
Weed management
Hand-pull invasive annuals early; spot treat aggressive perennials. Avoid broad herbicide use near waterways. Replenish mulch in buffer zones annually to suppress weeds. Use targeted smothering mats or biodegradable fabric in small problem patches.
Erosion and scour repair
If inlets show scour, arm with larger cobble, install stepping stones, or add vegetation with deep roots. Rebuild berms after major storms; use coir logs or wattles temporarily for slope stabilization.
Mosquito prevention
Proper design minimizes standing water duration; mosquitos breed in stagnant water beyond 48©?2 hours. Ensure infiltration and intermittent ponding rather than prolonged pooling. If small, persistent pools occur, add predatory biological controls (Bacillus thuringiensis israelensis ©?Bti) or introduce native predatory insects and fish in larger systems where appropriate. Avoid pesticides that harm beneficial aquatic insects.
Performance evaluation
Monitor infiltration: measure how long pooled water takes to drain after storms—target drawdown within 24©?8 hours for most residential rain gardens. Track plant survival and replace underperformers in the first two seasons. Log overflow events and adjust size or add secondary storage if overflow is frequent in storms you intend to capture.
Advanced Variations
Curb-cut rain gardens Capture street runoff via a curb cut. Coordinate with municipal authorities for approval and curb modifications. Often improves neighborhood stormwater performance and qualifies for public cost-share.
Downspout disconnection and distribution Redirect downspouts into shallow swales, infiltration trenches, or a disconnected pipe system that feeds multiple shallow basins. Rain chains and splash blocks can be decorative interim measures.
Bioswales Linear, planted channels with engineered soils for conveyance and filtration—ideal for driveway runoff or strip drainage along property edges. Design for periodic conveyance; include check dams for sediment capture.
Green roofs vs. rain gardens Green roofs reduce rooftop runoff at the source and are complementary: green roofs reduce peak flow load, while rain gardens manage remaining runoff at grade. Choice depends on roof capacity, budget, and landscape goals.
Cost Analysis & Incentives
DIY cost breakdown Typical DIY material and plant costs: $3©?5 per sq ft for modest installations using plugs and volunteer labor. For a 100 sq ft garden expect $300©?500 excluding tool rental. Major cost items: soil amendments, plants/plugs, river rock for inlets, and optional underdrain materials.
Professional installation Contractors typically charge $10©?15 per sq ft (varies with region, depth, and complexity). Professional designs, grading, and larger rock armoring increase costs.
Rebates and incentives (2026 context) Many municipalities now maintain searchable rebate databases for home stormwater practices; incentives range from flat rebates to stormwater fee credits or tax incentives. Conservation districts and watershed groups may offer cost share, technical assistance, or native plant discounts. Document project details—size, photos, perc data—to support rebate applications.
Conclusion
A well-designed rain garden installation is a high impact, low cost climate resilient solution: it solves localized drainage, enhances property aesthetics, supports pollinators, and can qualify for municipal incentives. With careful assessment, correct sizing, appropriate soil mix, and native plant selection, most homeowners can complete a durable rain garden in a single weekend and refine plantings over the first two seasons.
References
[1] Gilbreath, A., McKee, L., Shimabuku, I., Lin, D., Werbowski, L. M., Zhu, X., Grbic, J., & Rochman, C. (2019). Multiyear water quality performance and mass accumulation of PCBs, mercury, methylmercury, copper, and microplastics in a bioretention rain garden. Journal of Sustainable Water in the Built Environment, 5(4), Article 04019004. https://doi.org/10.1061/JSWBAY.0000883
[2] Winston, R. J., Dorsey, J. D., & Hunt, W. F. (2016). Quantifying volume reduction and peak flow mitigation for three bioretention cells in clay soils in northeast Ohio. NOAA Technical Memorandum. https://repository.library.noaa.gov/view/noaa/57627/
[3] King County Department of Natural Resources and Parks. (2024). GSI progress report 2023©?024: Green stormwater infrastructure installations. https://cdn.kingcounty.gov/-/media/king-county/depts/dnrp/waste-services/wastewater-treatment/program/rainwise/gsi-progress-report-2023-2024.pdf
[4] Chen, C. F., Chen, Y. W., Lin, C. H., & Lin, J. Y. (2024). Field performance of 15 rain gardens in different cities in Taiwan. Science of The Total Environment, 947, Article 174545. https://doi.org/10.1016/j.scitotenv.2024.174545
[5] Li, X., Zhang, Y., & Li, Z. (2024). The application of rain gardens in urban environments: A bibliometric review. Land, 13(10), Article 1702. https://doi.org/10.3390/land13101702
About the Author
Dr. Elena Vasquez-Ramirez is a certified stormwater management professional (CPSWQ) and licensed landscape architect with over 15 years of experience designing green infrastructure solutions for residential and municipal clients. She holds a Ph.D. in Civil and Environmental Engineering from Stanford University and a Master's degree in Landscape Architecture from the University of California, Berkeley. Elena has designed and overseen the installation of more than 400 rain gardens across the Southwest and Pacific Coast regions and has served as a technical advisor for municipal stormwater incentive programs in San Francisco, Los Angeles, and Phoenix. She is a frequent speaker at native plant society conferences and has contributed to extension service publications on sustainable landscaping and urban water management. Elena maintains a small design-build practice focused on climate-resilient residential landscapes and teaches workshops on DIY rain garden installation through local watershed conservation districts and community college continuing education programs.
Disclaimer
The information provided in this guide is intended for educational purposes only and does not constitute professional engineering, landscaping, or legal advice. Rain garden design and installation involve site-specific considerations that vary by location, soil conditions, climate, and local regulations. Readers should consult with qualified professionals, including licensed engineers, landscape architects, or certified stormwater professionals, before undertaking projects involving significant grading, drainage modifications, or structural concerns. The author and publisher assume no liability for property damage, personal injury, or regulatory non-compliance resulting from the application of techniques described herein. Always contact local utility locating services (811 in the U.S.) before digging and verify all permit requirements with your local municipality. Municipal incentive programs and regulations mentioned are subject to change; readers should consult current local sources for the most up-to-date information. Results from case studies cited represent specific conditions and may not be typical of all installations.